<body leftmargin=0 topmargin=0 marginwidth=0 marginheight=0>


top page, english, japanese


I was amazed at the chimney effect and the firepower of complete combustion.

It can be used as fuel for almost anything that burns, and it is small but powerful. It burns nearly perfectly, produces almost no soot, and is easy to clean up because the fuel is reduced to a small amount of pure white ash.
It seems to work well with wood, and at campgrounds, pine cones and twigs can be used as fuel. You can also prepare wood pellets and disposable chopsticks. I think it would work especially well with charcoal. If you throw a piece of charcoal in the fire, it will re-ignite when you add fuel even if the fire goes out.
There is no comparison to the small heat of an alcohol stove, and the risk of explosion or fire from tipping over is small. I guess that's the advantage of the chimney effect.

The heat generated by complete combustion is strong enough to be used not only for making coffee, but also for cooking.
I'm not sure if it's a good idea to use it for cooking or not. I'm not sure if it's a good idea for cooking, at least not for labor intensive cooking.

The first thing I made was a wood gas stove made from a beverage can, which is probably very small for a wood gas stove. At any rate, the combustion chamber is a 170ml can. If it had two or three times the capacity, it could be used to keep warm. The firepower is strong for its size.


Wood Gas Stove Handbuilding > Secondary Combust due to Pine Cones and Subbranches or Trash
24th March 2022, since 8th February 2022
--
 
outset. How it works
 
1. Structure and Combustion
2. Production Essentials
3. Beverage Cans
 
chapter1. Prototype
 
1. Parts
2. Procedure and Points
3. Evaluation
 
chapter2. Steel Can
 
1. Parts
2. Procedure and Points
3. Evaluation
4. wanted to create perfection
 
chapter3. Tin Cans
 
1. Parts
2. Procedure and Points
3. Evaluation
4. The Material Tinplate
 
chapter4. Stainless
 
1. ****
2. ****
3. ****


outset. How it works


The figure on the right is a cross-sectional schematic diagram of the protype. From now on, each part is described by the name shown in the right figure.

A brief description of how it works

The Inner Chamber is the combustion chamber, and the Outer Chamber is the side chamber, surrounding the sides and bottom of the Inner Chamber. There are Ventholes at the bottom of the Inner Chamber and the Outer Chamber, and at the top there are Ventholes in the Inner Chamber towards the Outer Chamber.

Fuel is burned at the bottom of the Inner Chamber, air enters through the Ventholes at the bottom, and the warm air including flames and wood gas from the primary combustion exits upward through the chimney effect.
The clean air that enters from the Ventholes at the bottom of the Outer Chamber is dispersed and rises to the top of the Outer Chamber as well as the Inner Chamber, and enters the Inner Chamber from the Ventholes at the top of the Inner Chamber, causing secondary combustion.


From the above, there are three main points for production

-- Height and shape enough to achieve chimney effect
-- Air intakes to draw in sufficient clean air
-- Sealing of the upper part of the Outer Chamber to the outside

As for the material, I don't want to be extravagant about titanium, but stainless steel would be good to use. The material should be stainless steel because it is resistant to heat and corrosion.
It's not ideal, but I'll try making it in a beverage can first.


3. Beverage Cans

Most beverage cans are made of aluminum, and some are made of steel.

I did a little research and found out that aluminum cans are made of 3000 or 5000 series aluminum alloy and coated with a synthetic resin coating on the inside to prevent corrosion. This is why they can withstand fruit juice and beer.
Comparing beverage cans with pull tops and screw caps, the latter is harder and has a relatively thicker wall. This may be to withstand the stress of turning the screw cap. The type of alloy may also be different.

It is essential to use steel cans for the Inner Chamber. Aluminum cannot be used because the temperature will be several hundred degrees Celsius. Of course, the Outer Chamber should also be made of steel cans. However, steel cans are labor-intensive to process, so I'd like to use aluminum cans if I can keep them.

Furthermore, I would like to consider diverting stainless steel cans. Beverage cans can only be very small in size, and steel cans are susceptible to corrosion.


chapter1. Prototype


Use three cans: two 350 ml aluminum cans and one 170 ml steel can.

In the left image, Ventholes have already been opened. The steel can will be in the Inner Chamber and the two aluminum cans will be at the top and bottom of the Outer Chamber.

The bottom of the Inner Chamber is filled with Ventholes. I attached a piece of perforated metal with double-sided tape and used it as a guide to drill the holes. I was able to drill the holes at neat intervals.
Fasten three bolts to the bottom of the chamber so that air can enter the bottom of the chamber and create a void.

This is because the Inner Chamber needs to be fixed so that it is sandwiched between the top and bottom of the Outer Chamber.
Since the temperature will be in the hundreds of degrees Celsius, we should assume that all kinds of adhesives cannot be used. Even if you can use heat-resistant putty, it is only useful for sealing, not for adhesion.


Fit the top part of the Outer Chamber into the Inner Chamber.
Apply heat-resistant putty to the gaps.

Accuracy in the size of the cut and the contact surface to be fitted is desired.

As it happens, if you cut off the curved surface at the center of the bottom of a 350ml aluminum can, you will be left with a hanging wall-like surface on the inside, and if you pull it slightly inward with pliers, you will be able to make surface contact with the Inner Chamber.

The slightest gap can be filled with heat-resistant putty.


Complete by fitting the top and bottom of the Outer Chamber.


3. Evaluation

I just threw in a pair of wooden chopsticks that I snapped off and ignited, and a huge fire started.

Back off and re-shoot.

The fire was not so much strong as it was highly efficient, and a pair of wooden chopsticks would quickly weaken the fire. Even so, the chimney effect seems to be sufficient, and the fire is still rising high even though it has become thin.

The inside of the Inner Chamber was burned to a crisp by the heat of a pair of wooden chopsticks. The coating unique to beverage cans melted away on the inside, exposing the steel surface. It must have been a certain temperature. After a few times of use, the coating completely melted and accumulated at the bottom of the Outer Chamber.

As I mentioned at the beginning of this article, the wood gas stove is unique in that it can provide a large amount of heat even though it is small, but the fuel needs to be added quickly.


The Ventholes at the top of the Inner Chamber was also on fire. I don't know if it's because of the clean air, or if the combustible gas generated by the primary combustion is passing through the Outer Chamber and getting in.

Functionally, I think it's perfect.

I'd like to make some coffee and measure the amount of fuel and time needed, but I don't have a tall pedestal, in the time...

As I continued to play with the fire, the Inner Chamber wobbled. It was pinched up and down, but wobbled slightly from side to side.
I hadn't expected the adhesive strength of the heat-resistant putty, but it looks like I need a stronger way to fix it than just sandwiching it.

Then, I drilled small holes in the contact surfaces of both Inner and Outer Chambers and fixed them with screws.


The top and bottom edges of the Outer Chamber are solid, but the center of the chamber, where the aluminum wall thickness is thin, is deformed by heat. The deformation is only a ripple, not enough to impair the function, but it is not very pleasant.

Maybe we should also use steel cans for the lower part of the Outer Chamber.


chapter2. Steel Can


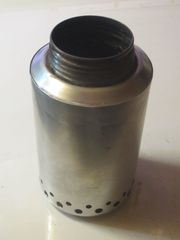
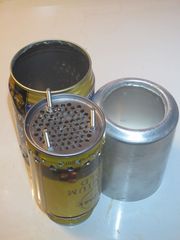
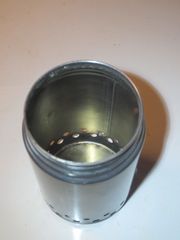
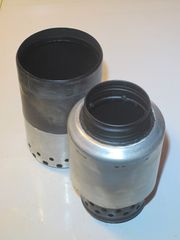
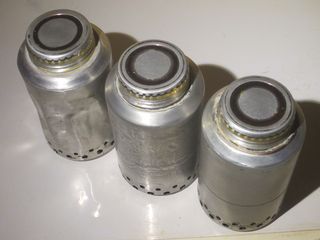
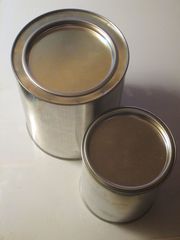
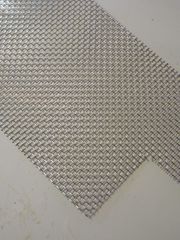
Use a steel can for the lower part of the Outer Chamber. The other cans used are the same as in the chapter 1 prototype.

However, 350ml steel cans are no longer sold, although a couple of years ago, there were several kinds. The steel can in the image on the right is 280ml in size, and it is about 20mm short in height, partly because the top is constricted.
I'd like to use this somehow to achieve the same functionality as the prototype.

When using steel cans, I would like to consider rust prevention, especially for the Inner Chamber. I also want to systematically treat the joint between the Inner Chamber and the top of the Outer Chamber.

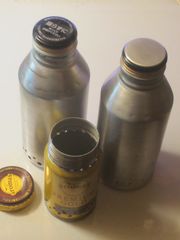
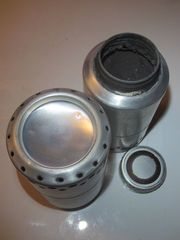
Cut out the top of the steel can with a can opener. Put an aluminum can on top of it to make an Outer Chamber.
The top aluminum can is basically the same as the prototype, but cut out a longer piece to cover the steel can.

The rest is the same as the prototype.


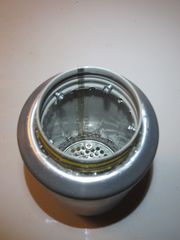
The joint between the Inner Chamber and the top of the Outer Chamber should be highly precise. This is the same as the prototype.

Fix it with some kind of adhesive in case you want to remove it later.
Then, drill a hole in the joint between the inner and outer chambers. Since it will be fixed with screws, drill a hole one size smaller than the screws to be used, insert the screws shallowly, and fasten them temporarily to check the accuracy of the joint.

I used epoxy, which is not heat resistant, as the adhesive. It can be fixed strongly, but can be easily removed by dipping it in boiling water.


Anti-rust

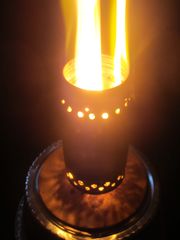
Melt the inner coating and the outer coating with fire.
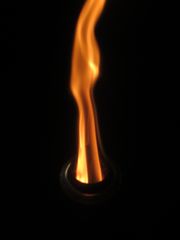
First, the Inner Chamber, which also serves as a chimney effect combustion test.

The inner coating and the outer paint were burned to white ash.

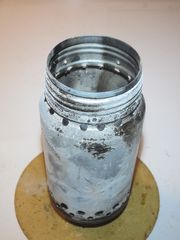
I polished this with a sponge sander and cleaned it with anhydrous methanol, revealing a dull, shiny steel crust.

This is beautiful in its own way, but if used as is, it will certainly rust.
Too bad I can't find transparent heat-resistant paint.


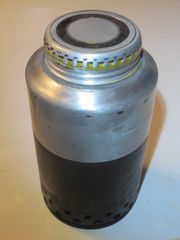
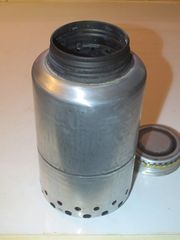
The lower part of the Outer Chamber, the steel can, is also cleaned and degreased by burning the inner coating and outer paint with fire.


Heat resistant coating on these two steel cans.

I used a paint that can withstand up to 650 degrees Celsius, which should be enough for the Outer Chamber, but I won't know if the Inner Chamber can withstand the paint until I try it.

The flame temperature is supposed to be 700-800 degrees, so it might not work. Even the temperature of the charcoal fire will be about 650 degrees.

Using it is equivalent to hardening. It is done after the coating has sufficiently hardened.


The above is more durable than the prototype.


Combine. Contrary to the prototype, the top of the Outer Chamber will be outside the bottom.

The top and bottom have the same outer diameter. It was impossible to stack and push them together over several centimeters, so I set the height of the aluminum that would be the top to 40 mm.
I tried to expand the aluminum at the top, but it was too tough to do so. Maybe, though, if I turned on the fire, I could have pushed it in.

The joint of the Inner Chamber is fixed with screws, but since a small gap is created, it is filled with heat-resistant putty.
This heat-resistant putty should be applied as thinly as possible. In order to do this, it is important to have a high degree of precision in the aluminum joint area. By doing so, the putty-only areas will be thinner and smaller, and the brittleness of those areas can be avoided.


Then there's the hardening of the heat resistant coating. You can use this.


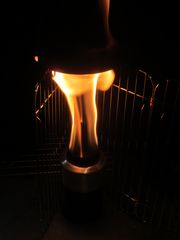
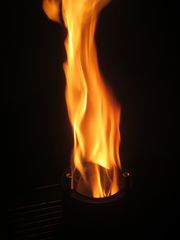
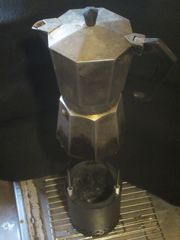
I made a pedestal from what I had and made 500 ml of espresso.
The only fuel is wooden disposable chopsticks.
I threw in 17 pairs of disposable chopsticks and it took me 15 minutes.

With a gas stove, it takes 7 to 8 minutes on medium heat. 15 minutes is more than practical, but from the looks of it, I thought it would have more heat. This is no different than a high efficiency alcohol stove.
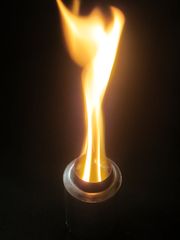
Surprisingly, the firepower of the alcohol stove is stronger than the appearance of the flame.

I was able to make 500ml of espresso with 17 pairs of wooden chopsticks, which may be highly efficient. This could only be achieved by secondary combustion. If you can collect pine cones and twigs at the campsite, you will have no shortage of fuel.

As for the fire power, this size, very small for a wood gas stove, probably means that there is a limit. The apparent flame is quite powerful, though.
The burning pace, which can only throw in a little over one pair of disposable chopsticks per minute, is probably the immediate result of the weak thermal power.


postscript

The time taken to make the espresso was reduced by adding fuel in such a way as to maintain a strong heat rather than waiting for it to weaken.

By using 22 pairs of chopsticks in 11 minutes, I was able to make 500ml of espresso.
That's one chopstick every 30 seconds, closed to double the pace of the first experiment. It took 30% more fuel though.

Furthermore, in the next experiment, I was able to make 500ml of espresso by throwing in 18 pairs of disposable chopsticks in 10 minutes.
Although it was still cold season, the temperature had risen by about 4 degrees compared to the previous experiment. And the water temperature might be different.

The time and fuel might be more reduced to use it in summer.


The Inner Chamber is the same as in the previous chapter, and the aluminum can that holds the Inner Chamber in place is covered from the top as in the previous chapter.

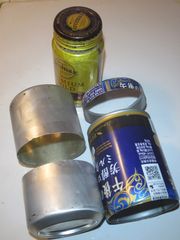
For the Outer Chamber, use four cans, steel cans on the inside and aluminum cans on the outside.
Cut off the thinner part of the steel can, and cut another can to fill the missing length. Cut out the bottom with a can opener to make a cylinder with both sides removed.
Cover the bottom with an aluminum can and open the Ventholes with the aluminum and steel cans overlapping

This is done to eliminate weak areas of aluminum cans only, and to cover the heat-resistant coating of steel cans with aluminum cans without exposing it as much as possible, so that the cans can be handled roughly.


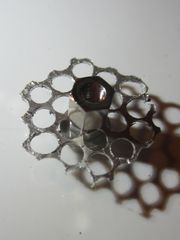
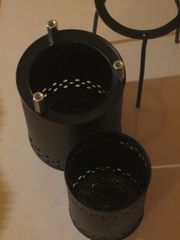
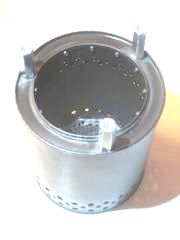
Parts added for this project. A small perforated metal bolt is attached to the center of the bottom of the Inner Chamber to create a partial double-bottomed structure.
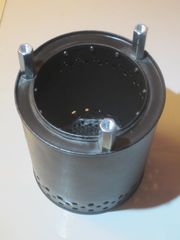
The one in the image was too small, so a larger one was installed. This part is easy to install and remove even after completion, so it can be changed as an optional part.

This is a standard practice in wood gas stoves and allows for minimal airflow even if ash builds up at the bottom due to over-fueling or poor quality fuel.

The ends have ventholes on the sides and airflow is rarely obstructed. Double-bottomed only in the center to ensure airflow from the center of the bottom and to allow airflow to the sides even if fuel is blocked on it.


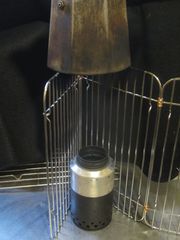
Push in and complete.

Can be inserted into bicycle holders without hesitation.

This is enough for day campers to make simple food and coffee.

Wish to have a base for pots and pans that can be folded and compacted.


Of course, I'd like to get another two sizes larger.


An additional part.The aluminum parts installed at the bottom of the Inner Chamber began to melt and deform due to the high heat. I plan to replace it with stainless steel.

It may be difficult to see in the above images, but the gap between the top and bottom aluminum cans was about 1.5 mm immediately after completion, but it became less than 0.5 mm while being used. The aluminum may have been stretched by the heat.
It does not appear to extend further with repeated use. Coincidentally, but miraculously, it fits perfectly.


The second stove was also dismantled and rebuilt.

The first prototype had an aluminum-only Outer Chamber that was wavy and deformed. However, functionally, it remains normal.
I put it under the ventilation fan and use it as a shredder.


Note the underside of the bottom of the chamber, where the three bolts that form the legs of the Inner Chamber are pressed against each other, creating small protrusions. This holds the Inner Chamber in place at the top and bottom, making it more resistant to vibration during transportation.


chapter3. Tin Cans


I used two plain tin cans that are sold at home improvement stores. I really wish I had a stainless steel can.

The can used for the Inner Chamber has a capacity of 620ml. It may be small for a wood gas stove, but it has 3.65 times the capacity of the one in the previous chapter. I think we can expect a strong fire.

Because of the bottom connection process, the smaller part does not fit into the opening of the larger one just barely. Once that point is cleared, the body part is just barely large enough to fit into the opening.
If you push the larger opening in a little and let it expand, you can push the smaller can in. Then, when you try to pull it out, the bottom of the can will get caught and it will not come out easily.
This means that there are only a few gaps, and we can fill them with heat-resistant putty to get a good structure.

And since the treatment of the top is exactly the same as the bottom, the top of the smaller can catches at the opening of the larger can. If fixed in this state, it will be structurally ideal.


Other basic instructions are the same as for the steel cans in chapter 2. Heat-resistant coating is applied for rust prevention, etc.


First, cut off the edge of the Inner Chamber that holds the can lid using a can opener. This is because it hides the point for fixing the Inner Chamber to the Outer Chamber with screws.

Drill through Ventholes.

Ventoholes for secondary combustion are opened a little lower than the opening of the Inner Chamber, since the parapet cannot be placed above the Inner Chamber as in the prototype.
Without parapets like the prototype, the secondary combustion would be stirred up by the wind.

Ventholes can be opened at the very edge of the opening and parapets can be added as separate parts.


The bottom of the Inner Chamber would have been easier if I had drilled out a large hole leaving the edge and bolted stainless steel perforated metal or mesh to it, but personally, I simply wanted to create a clean look, so I drilled a hole directly through the bottom of the tin can, just like the prototype.
Perforated metal was used as a guide, just like the prototype.


Drill holes to fix Inner Chamber and Outer Chamber with screws.
The opening of the Outer Chamber has a hanging wall a few millimeters wide to hold the lid in place, and a hole is drilled through the center of the wall.


Since it is of a certain size, I would like to install a guide in the Outer Chamber for the pot to be placed on, but it should be removable, not a fixed object.
For now, I fixed the long nut with a short bolt. Here you can insert a tripod, which is familiar from chemistry experiments. Of course, you can also fix a bolt, so the base of the pot is up to your imagination.
This is the choice of stainless steel.


Heat-resistant coating is applied to prevent rusting. Tinplate cans rust easily.


As in the previous section, double-bottom only the center portion of the bottom of the Inner Chamber. Bolt the stainless steel mesh to a height slightly above the bottom.


Push the Inner Chamber into the Outer Chamber and fix with screws to complete.


Even if there is a lot of room left for fuel, a little fuel will make a fire column rise about 50 cm.

It is warm enough for few people to sit around it and keep warm.

That said, it is a small wood gas stove, so if you were to put wood in it, it would need to be reasonably thin and short

It is large enough to use pine cones and twigs as fuel. It will come in handy at campsites where it is easy to procure.


As usual, I made 500ml of espresso using wooden disposable chopsticks as fuel.


The time was shortened a little to about 8 minutes, and 25 chopsticks of fuel were needed, resulting in a significant decrease in fuel consumption.
The larger the size, the more likely this will be the case.
The amount of heat radiated to the surroundings is also greater.

Compared to smaller ones, it is easier to fill with fuel and has stronger heat, so it can be used for cooking pots and pans.
I wonder if it would be optimal if fuel could be obtained cheaply or free of charge.


Tinplate is not a suitable material for stoves.
Zinc plated on the surface of iron, easily rusted by water, and zinc is melted by heat up to 400 degrees Celsius.

The paint on the inside of the Inner Chamber peeled off after several hours of combustion, and some of the paint on the outside of the Inner Chamber began to peel off after several dozen hours of combustion.
This is probably due to the dissolution of zinc. No change in the Outer Chamber.

It would be better to have the zinc exfoliated than to have it remain as it is, only because it is less likely to rust.
Better yet, the zinc should be exfoliated by heat treatment and filing at the material stage before fabrication, and then heat-resistant paint should be applied.


chapter4. Stainless


If you have any comments


e_mail to webmaster